
Week 4 - Follow Up and Full Guide
This entire month has been dedicated to giving you projects you can do with someone special. Not some boring project, but exciting do-it-yourself projects anyone can get behind. To give you an incentive, we have even been offering you an additional 10% OFF the parts you'll need to get these projects done. This week marks the end of these projects and the culmination of all we have worked on. Here, we will wrap up the project, and go over each step one-by-one from start-to-finish in order to give you a full on comprehensive view. This way, you can get the information you need without having to hunt for it. Let's not waste anymore time and get to it. As always, we'll start by making sure we have all the parts needed to get the project done.

What You'll Need:

Panel Blanks
- 5052 H32 Aluminum
- Powder Coated on both sides

Breakers
- Rugged Thermal Breaker
- Push-to-Reset for Ease of use

Boots
- Protect Breakers
- Durable for repeated use

Switches
- 1,000 of uses
- Multiple varieties Available

Switch Covers
- UV Resistant
- Over 700 options

Wire jumpers
- Simplify Installation
- Save Time & Money

UL Wire
- High quality, marine grade
- Flexible & Durable

Terminals
- Easy to use and Install
- 100's of options available

Crimper
- Correct Crimp every time
- Built for superior quality

Cable Ties
- Long lasting Durability
- Built for ease of use

Connectors
- Environmentally sealed
- Built for longevity & durability

Heat Shrink
- Durable for long term use
- Multiple shrink ratios available
Click HERE for an Easy to Follow Downloadable Version of this List.
Video Tutorial
To make this project easier, we have added this video which briefly covers all the steps you'll need to take to build your own panel. This way you can get the information in a quick and simple streamlined process.
Not everybody wants to watch a video and we get that. If you would prefer, you can scroll further down the page and find the precise step that you are looking for.
Step 1: Breakers and Boots

After you have gathered the parts you need, the first step is to install the breakers and waterproof breaker boots into the body of the panel. The size of the breakers determines as to whether you will need to use spacers or not. Use the checklist above, follow the links to the products used and you will not have to worry about spacers or anything else. We have taken the steps to ensure everything already fits perfectly.
![]()
Step 2: Rocker Switches

Once the breakers have been snapped into place, the next thing to do is to correctly install your rocker switches. Remember to pay special attention to the orientation of the switches so that you don't put them in upside down. There is a wide range of options when it comes to types of rocker switches, so plan ahead. If you're using lighted rocker switches or momentary rocker switches, you'll need to place them accordingly based on your personal setup.
![]()
Step 3: Switch Covers

When your rocker switches are properly loaded, you can move on to adding the switch covers. This is probably the easiest part of this project. Choose the switch covers that match your needs. There are a variety of choices from body color and style to the number of lenses available. You can even choose your lens color whether you want white, red, or blue. Once you have the switches you need, simply snap the switch cover over the rocker switch body you have assigned it to and you're done.
![]()
Step 4: Wire Jumpers

Wire jumpers are designed to be a time saver. Instead of spending hours prepping, cutting stripping, terminating and heat shrinking wires, these come pre-assembled for you. They take hours off the installation time and make the entire process much simpler. Since they are designed to be used on panels, they are a perfect fit for the switches. Use the proper length, color, gauge size, and terminal based on what you need. You won't find a solution easier than plug-and-play. Remember that these types of crimp connectors and electrical connectors are built for harsh conditions making them ideal for marine use.
![]()
Step 5 : Wires

This step involves cutting wires to the proper length and stripping the ends so that they can correctly fit into their intended terminals. Be careful when cutting and stripping, not to damage the internal conductors. If you cut too deeply when stripping the insulation off, you can potentially remove some of the internal conductors as well and limit the potential of your wire. It's best to use the properly recommended tools.
![]()
Step 6 : Termination

With your panel ready, you need to finish preparing the wires by crimping them correctly with their designated terminals. This involves using the right tools on the correct settings. If you use the incorrect tool, you run the risk of damaging not only the crimp connectors but the wire and possibly even the tool. Make sure that each terminal is securely in place by giving them a quick pull to see if they come loose..
![]()
Step 7 : Heat Shrink Connectors

Properly used heat shrink can create a watertight, environmentally sealed connection. When utilizing heat shrink, be careful not to apply too much heat to the insulation of the wire. It is quite easy to burn the insulation which can lead to the wire needing to be replaced. A safe bet is to maintain a further distance than you think you need and slowly work closer to the heat shrink until you find that sweet spot.
![]()
Step 8: Sealed Connectors

Now with your wires properly terminated, the next step is to plug them into an environmentally sealed connector. You will want to use connectors that are designed to handle the harsh marine environment. More than just waterproof, you need something that is vibration and impact resistant. You need the highest level of protection possible for long-term marine applications.
![]()
Step 9 : Connection Wires

With everything else set in place, its time to connect your breakers and switches to the power. If you plan to use a multitude of wires, ensure that you consider striped wires, as they make identification a simple task later on. Be sure to prepare your connection wires by making them the proper length with an extra margin for error. Be careful to keep your wires separated from each other to make the next step go more smoothly.
![]()
Step 10: Cable Ties

Cable ties are a place in the process that you don't want to cut corners. When you use high-quality cable ties you not only secure your wires, you protect them as well. Additionally, you improve the appearance of your electrical system and make it easier to navigate. As you travel in your boat on the water, it is subject to impact and constant vibration. When you limit the movement of internal components, you reduce the risk associated with that damage. Cable ties do just that by securely holding things in place.
![]()
SUCCESS: Completed Panel
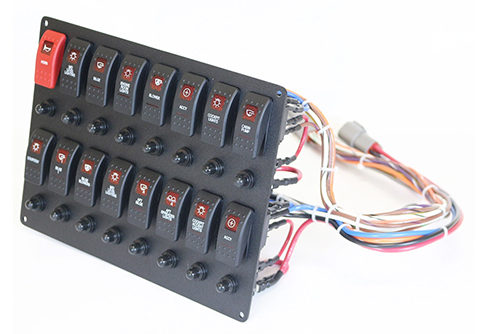
There you have it. These simple steps made it easier than you thought it would be right? Being able to get all of the parts you needed from one source saves you time and money. Just look what you accomplished. Your very own hand built custom panel. Now you can be the envy of your friends. When they get jealous, you can point them here to this guide. It's all about teamwork.
![]()
Project Schedule
