
Week 2 - Proper Connector Usage
Using this time to the best of our abilities is a great way to build memories and ensure a brighter future. This week we are going to look at properly using electrical connectors, so let's dive right in. It's important to make sure you know what you're doing before taking on a task like building a panel. Although there are a variety of electrical connector types, we get the most questions about butt splices so we'll take a look at how to use those. We'll start with the simplest step, getting the parts you'll need together and prepped for use. Below you'll see a simple list of the parts you'll need for this part of the process.
*Note: If you intend to use a different type of connector, you'll find everything you could ever want with Pacer. Take a look HERE to find the connector right for your needs.

What You'll Need:

Crimper
- Correct Crimp every time
- Built for superior quality

Terminals
- Easy to use and Install
- 100's of options available

UL Wire
- High quality, marine grade
- Flexible & Durable

Heat Shrink
- Durable for long term use
- Multiple shrink ratios available
Click HERE for an Easy to Follow Downloadable Version of this List.
Video Tutorial
We have created a short video to walk you through the steps involved with proper connector usage. You'll find that this video is short, sweet, and to the point. The goal is to get the information that you need as quickly as possible so you can get back to doing the things you love with the people you care about.
If you prefer, we have outlined the steps below. This way you can take your time and get straight to the information you need, as you need it.
Step 1: Prep the Wires

The first step, after you collect the parts and tools you'll need, is to strip the wire to the proper length. When using a butt splice, there is a small indentation inside the body of the butt splice where the wire is supposed to butt up to. So you will need to strip your wires to meet that internal indentation. Properly stripping the wire involves cleanly cutting the insulation without damaging the internal conductors.
![]()
Step 2: Insert Wire to Proper Depth

As I said above, your wire needs to butt up against the internal indentation of the butt splice. There is, however more to it. The insulation of the electrical wire connectors needs to butt up to the outside of the butt splice barrel. What I mean is that the insulation needs to touch the metal of the butt splice with no room for the conductors to be exposed. If you leave the conductor exposed, you weaken the strength of the connection and make it more susceptible to failure.
![]()
Step 3: Crimp Using the Proper Tool

I cannot overstate the importance of using the proper tool for the job. The crimper we have listed is the ideal tool for use with epoxy lined heat shrink butt splices. If gives the correct crimp each time. To use it, simply place the butt splice into the color-coded crimping nest with the wire securely in place. It is vital to use the proper tool regardless of the types of crimp connectors you are using. Now close the handles together to engage the ratcheting action creating a solid connection between the wire and the butt splice. Now you repeat the process on the other side, or you can crimp the other side closed creating a dead end.
![]()
Step 4: Perform a Tug Test

The tug test is a simple method to determine whether or not you have created a solid connection. To perform the tug test, simply grab both wires outside of the butt splice and gently tug two or three times. You are attempting to feel for slippage or give in the connection points. If you feel any give, you need to address it immediately. This helps to prevent any potential issues before they turn into problems down the road.
![]()
Step 5: Activate the Heat Shrink
Once you have a solid connection on your butt splice, you will need to shrink the heat shrink down. The heat shrink serves to protect the connection from abrasion and impact and, more importantly, creates an environmental seal that will keep out moisture and other contaminants. Be careful not to use too much heat as it will damage the wire insulation and potentially, the internal conductors. It's best to practice on an unimportant piece first.
![]()
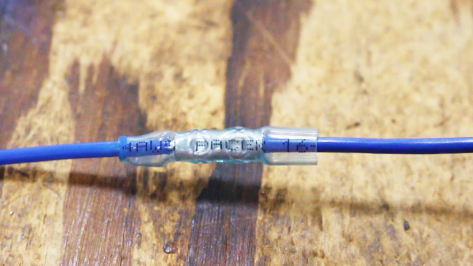
SUCCESS: An Environmentally Sealed Connection

There you have it. These simple steps made it easier than you thought it would be right? Being able to get all of the parts you needed from one source saves you time and money. Now you know how to effectively and rapidly create a solid environmentally sealed connection. Don't forget to send us photos of your project so we can see what you've accomplished.
![]()
Products You'll Need for the Rest of the Project:
Here is the list of the products you will need for the remainder of the project. Each if these is fully linked to take you directly to the products. Don't forget to use your 10% OFF on applicable items.


Panel Blanks
- 5052 H32 Aluminum
- Powder Coated on both sides

Breakers
- Rugged Thermal Breaker
- Push-to-Reset for Ease of use

Boots
- Protect Breakers
- Durable for repeated use

Switches
- 1,000 of uses
- Multiple varieties Available

Cable Ties
- Long lasting Durability
- Built for ease of use

Switch Covers
- UV Resistant Printing
- Over 700 Available Options

Wire jumpers
- Simplify Installation
- Save Time & Money

Connectors
- Environmentally sealed
- Built for longevity & durability
Project Schedule

